Headlight Lens Restoration: A Comprehensive Guide
Table of Contents
Introduction
In this comprehensive guide, we will delve into the world of headlight lens restoration and explore why it is a crucial maintenance task for every vehicle owner. Your headlights are not just essential for illuminating the road ahead; they also play a vital role in ensuring your safety and the safety of others on the road.
When your headlight lenses become damaged or deteriorated, various issues can arise. The clarity of the light emitted can diminish, reducing visibility during nighttime driving or adverse weather conditions. Moreover, damaged lenses can also lead to a decrease in the aesthetic appeal of your vehicle, making it appear worn out and neglected.
With proper headlight lens restoration techniques, you can reverse the effects of the damage and restore your headlights to their original clarity and functionality. Not only will this enhance your visibility on the road, but it will also contribute to the overall appearance and value of your vehicle.
In the following sections, we will explore the different aspects of headlight lens restoration, including assessing lens condition, necessary preparations, cleaning techniques, removal of oxidation and yellowing, repair of scratches and cracks, application of protective coatings, and maintenance tips for prolonged clarity. By following this comprehensive guide, you’ll gain the knowledge and skills to restore your headlight lenses and keep them in optimal condition.
Remember, maintaining clear and functional headlights is not just a matter of aesthetics but also a crucial safety measure. So let’s dive into the world of headlight lens restoration and learn how to give your vehicle the clear vision it deserves.
Understanding Headlight Lens Damage
When it comes to headlight lens damage, various factors can contribute to its occurrence. Understanding these causes and the effects they have on visibility and aesthetics is crucial in comprehending the importance of headlight lens restoration.
- UV Exposure: The sun’s ultraviolet (UV) rays can be extremely harmful to your headlight lenses. Over time, prolonged exposure to UV radiation can cause the lenses to fade, become cloudy, or develop a yellowish tint. This not only affects the overall appearance of your vehicle but also reduces the effectiveness of the headlights, leading to decreased visibility during nighttime driving.
- Oxidation: Another common cause of headlight lens damage is oxidation. When the protective coating on the lenses deteriorates due to environmental factors or aging, the lenses become vulnerable to oxidation. This results in a hazy or foggy appearance, which obstructs the light output and compromises the clarity of your headlights.
- Environmental Factors: Your headlights are exposed to various environmental elements, such as dirt, dust, pollutants, and road debris. Over time, these factors can accumulate on the lens surface, creating a layer of grime that diminishes the effectiveness of the headlights. Additionally, small scratches may appear on the lens due to contact with debris, further affecting the quality of the light emitted.
Understanding the causes of headlight lens damage is essential for addressing the issue effectively. By recognizing the detrimental effects of UV exposure, oxidation, and environmental factors, you can take proactive measures to restore your headlight lenses and ensure optimal visibility and aesthetics for your vehicle.
Assessing the Condition of Headlight Lenses
To determine the extent of damage to your headlight lenses and assess whether restoration is necessary, follow this step-by-step guide for visually inspecting your headlights:
- Clean the Lenses: Start by thoroughly cleaning the lenses with a mild soap solution and water. Use a soft cloth or sponge to remove any dirt, grime, or debris from the surface. This will ensure a clear view of the lens condition.
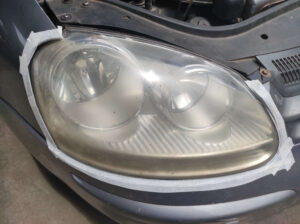
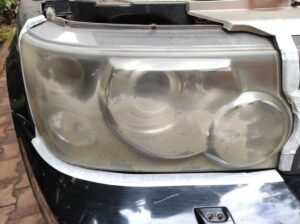
- Inspect for Yellowing: Examine the lenses for any signs of yellowing. Yellowing is a common issue caused by UV exposure and oxidation. Look for a noticeable discoloration or a yellowish tint that affects the clarity of the lens. Yellowed lenses can significantly diminish the brightness and range of your headlights.
- Check for Fogging or Hazing: Fogging or hazing is another problem that can impair the performance of your headlights. Inspect the lenses for a cloudy or foggy appearance. These conditions can be caused by environmental factors and oxidation, reducing the effectiveness of the light emitted and obstructing visibility.
- Look for Scratches: Scratches on the lens surface can also affect the quality of light output. Carefully examine the lenses for any visible scratches or abrasions. Even minor scratches can scatter the light, resulting in reduced clarity and projection.
By following this systematic approach to inspecting your headlight lenses, you can identify signs of yellowing, fogging, hazing, or scratches. This assessment will help you determine the appropriate course of action, whether it’s restoring the lenses yourself or seeking professional assistance. Remember, maintaining clear and well-functioning headlights is essential for your safety on the road.
Preparation and Safety Measures
Before embarking on the headlight lens restoration process, it’s crucial to prepare adequately and prioritize your safety. Follow these essential steps to ensure a smooth and secure restoration experience:
- Gather the Necessary Tools and Materials: Before you begin, make sure you have all the required tools and materials on hand. Here’s a checklist of items you’ll typically need for headlight lens restoration:
- Sandpaper in various grits (ranging from coarse to fine)
- Headlight restoration kit or specialized polishing compound
- Microfiber cloths or soft lint-free towels
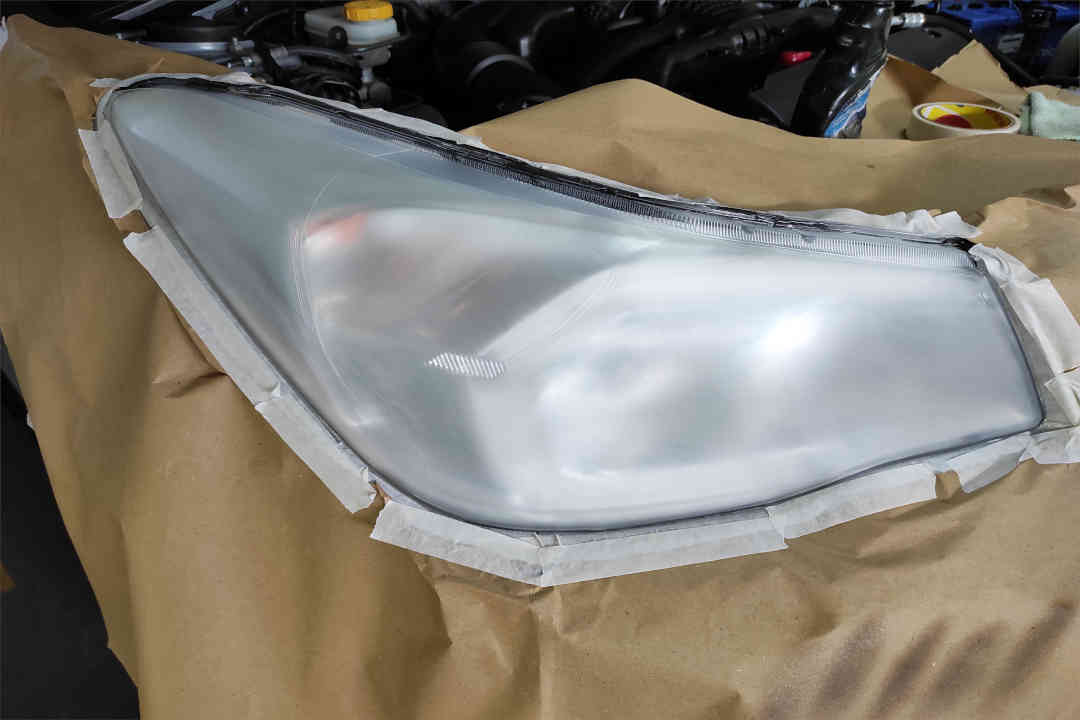
- Masking tape or painter’s tape
- Water spray bottle
- Plastic or vinyl protectant (optional)
- UV sealant or clear coat (optional)
2. Safety Precautions: When working with headlight restoration products and performing sanding or polishing, it’s important to prioritize safety. Take the following precautions to protect yourself:
- Wear safety goggles or protective eyewear to shield your eyes from debris and chemicals.
- Put on latex or nitrile gloves to protect your hands from any potential irritants.
- Work in a well-ventilated area or consider wearing a respirator mask to avoid inhaling dust or fumes.
- If using chemical-based products, read the instructions and warnings carefully and follow them strictly.
By gathering the necessary tools and materials and adhering to safety measures, you can ensure a productive and safe headlight lens restoration process. These preparations will enable you to achieve optimal results while minimizing any risks associated with the restoration procedure.
Cleaning the Headlight Lenses

Properly cleaning the headlight lenses is a crucial step in the restoration process. Follow these step-by-step instructions to effectively remove dirt, grime, and debris, restoring clarity to your headlights:
Gather the Required Materials:
- Mild soap or automotive shampoo
- A clean bucket filled with warm water
- Soft microfiber cloths or sponge
- Soft-bristle brush (optional)
- Water hose or spray bottle
- Rinse the Lenses: Start by rinsing the headlight lenses with water to remove loose dirt and debris. Use a gentle stream of water from a hose or a spray bottle.
- Prepare the Cleaning Solution: Fill a clean bucket with warm water and add a few drops of mild soap or automotive shampoo. Mix the solution to create a soapy mixture.
- Apply the Cleaning Solution: Dip a soft microfiber cloth or sponge into the soapy water and gently wipe the entire surface of the headlight lenses. Pay attention to areas with stubborn dirt or grime. For tough-to-reach spots, you can use a soft-bristle brush to gently scrub the surface.
- Rinse Thoroughly: Once you have cleaned the lenses, rinse them thoroughly with clean water. Ensure that all traces of soap or cleaning solution are removed.
- Dry the Lenses: Use a clean, dry microfiber cloth to gently dry the lenses. Pat them dry instead of rubbing to avoid scratching the surface.
By following these steps, you can effectively clean the headlight lenses, removing dirt and grime that may affect their performance. Clean lenses will not only enhance visibility but also prepare them for the subsequent restoration process.
Removing Oxidation and Yellowing
Over time, headlight lenses can become yellowed and oxidized due to prolonged exposure to the elements. This not only affects the appearance of your vehicle but also reduces the effectiveness of your headlights. Fortunately, there are several methods available to restore the clarity and shine of your lenses. Here are some effective techniques for removing oxidation and yellowing:
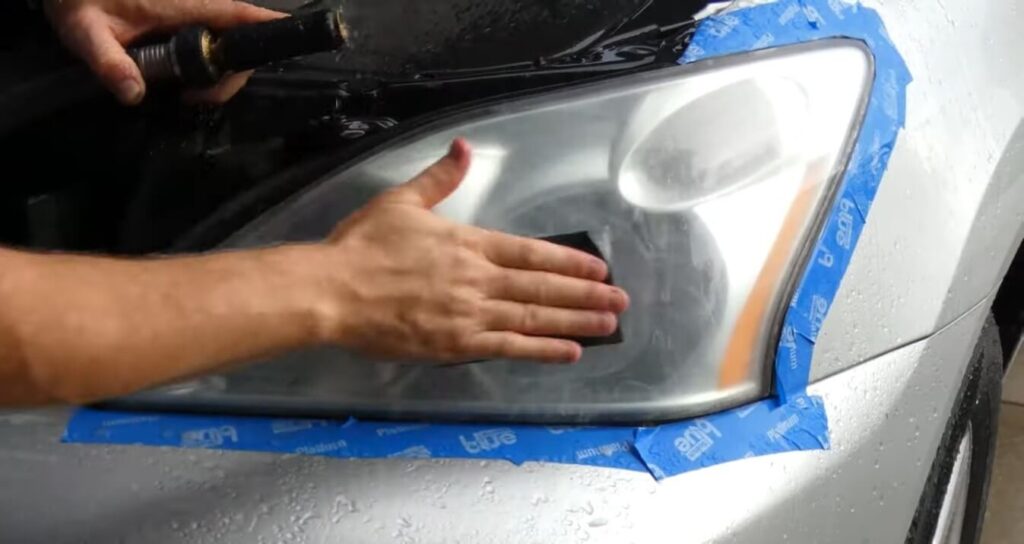
Wet Sanding:
- Wet sanding involves using fine-grit sandpaper and water to gently remove the outer layer of the lens, effectively eliminating oxidation and yellowing.
- Start by thoroughly cleaning the lens and then wet the sandpaper with water.
- Begin sanding in a back-and-forth motion, applying light pressure. Keep the sandpaper and lens wet throughout the process.
- Gradually switch to a higher grit sandpaper to refine the surface until the lens appears clear and smooth.
- Rinse the lens and dry it before proceeding to the next step.
Polishing
- Polishing is a technique that uses abrasive compounds to remove surface imperfections and restore clarity.
- Apply a small amount of plastic or headlight polish onto a clean, soft cloth or polishing pad.
- Work the polish onto the lens using circular motions, applying moderate pressure.
- Continue polishing until the lens becomes clear and free of haze or scratches.
- Wipe off any residue and inspect the lens for improvement.
Specialized Restoration Kits:
- Restoration kits specifically designed for headlight lenses are readily available in the market.
- These kits typically include various restoration compounds, pads, and a sealant to restore clarity and protect the lens.
- Follow the instructions provided with the kit, as they may vary depending on the brand and product.
Remember to take your time and work carefully during the restoration process. It’s essential to maintain a consistent motion and avoid applying excessive pressure, as this can damage the lens. Always refer to the specific instructions provided by the product manufacturer for best results.
By utilizing these techniques, you can effectively remove oxidation and yellowing from your headlight lenses, restoring their original clarity and improving both the aesthetics and functionality of your vehicle’s headlights.
Repairing Scratches and Cracks
Headlight lenses are susceptible to scratches and cracks, which can diminish their performance and appearance. However, there are effective methods available to address these issues and restore the integrity of your lenses. Here are some techniques for repairing minor scratches and cracks on headlight lenses:
Abrasive Compounds:
- For minor scratches, you can utilize abrasive compounds specifically designed for headlight restoration.
- Clean the lens thoroughly and apply a small amount of the compound onto a clean, soft cloth.
- Gently rub the compound onto the scratched area in a circular motion.
- Continue this process until the scratches start to fade or disappear.
- Wipe off any residue and inspect the lens for improvement.
Plastic Repair Kits:
- Plastic repair kits are available in the market and can be used to address both scratches and small cracks.
- These kits typically include a repair resin and clear adhesive film.
- Clean the lens and apply the repair resin to the scratched or cracked area according to the kit’s instructions.
- Place the adhesive film over the resin and use a specialized curing tool, usually included in the kit, to harden the resin.
- Once the resin has cured, remove the adhesive film and inspect the lens for any remaining imperfections.
Professional Repair Services:
- If the scratches or cracks on your headlight lenses are extensive or require professional expertise, it may be best to seek the assistance of a professional repair service.
- Professional technicians have the knowledge and experience to handle more severe damage and provide precise repairs.
- They may use advanced techniques such as lens resurfacing, filling, or even lens replacement if necessary.
It’s important to note that not all scratches or cracks can be fully repaired, especially if they are deep or extensive. In such cases, replacing the entire headlight assembly might be the best option.
Regular maintenance and prompt repair of scratches and cracks on your headlight lenses will not only enhance the aesthetics of your vehicle but also ensure optimal visibility and safety while driving at night or in low-light conditions.
Remember to follow the instructions provided with any repair product or consult with a professional if you’re uncertain about the best approach for your specific situation.
Applying Protective Coatings

To ensure the long-term durability and clarity of your headlight lenses, it’s crucial to apply protective coatings. These coatings act as a barrier against environmental factors and help prevent future damage. Here’s why applying protective coatings is essential and the different types of coatings available:
Importance of Applying Protective Coatings
- Preventing Oxidation and Yellowing: Protective coatings create a shield that helps block harmful UV rays, a common cause of oxidation and yellowing of headlight lenses. By reducing UV exposure, the coatings can significantly slow down the aging process of the lenses.
- Enhancing Scratch Resistance: Many protective coatings have scratch-resistant properties. They form a tough layer that can withstand minor abrasions, reducing the risk of scratches caused by road debris, rocks, or car wash brushes.
- Improving Clarity and Visibility: Coatings can enhance the optical clarity of headlight lenses. By filling in microscopic imperfections and smoothing out the surface, the coatings reduce light dispersion and increase the effectiveness of your headlights, ensuring better visibility on the road.
Types of Protective Coatings
- UV-Resistant Sealants: These sealants are specifically formulated to protect against UV damage. They create a clear, durable layer on the surface of the lens, acting as a barrier against harmful rays. UV-resistant sealants provide long-lasting protection and help maintain the original clarity of the lenses.
- Clear Protective Films: Clear films are transparent adhesive films designed to be applied directly onto the headlight lenses. They provide a physical barrier that shields the lenses from scratches, rock chips, and other external factors. Clear protective films are an excellent option if you prefer a removable and replaceable protective layer.
When applying protective coatings, it’s important to follow the manufacturer’s instructions carefully. Clean the lenses thoroughly before application to ensure proper adhesion and effectiveness of the coating. Regular maintenance and reapplication of protective coatings will help prolong the lifespan of your headlight lenses and keep them looking clear and vibrant for years to come.
Remember, investing a little time and effort into protecting your headlights can go a long way in maintaining your vehicle’s safety, appearance, and functionality.
Maintenance Tips for Prolonged Clarity
Once you have restored your headlights to their original clarity, it’s important to implement regular maintenance routines to ensure their prolonged clarity and functionality. By following these maintenance tips, you can keep your headlights in optimal condition:
Cleaning Routines
- Regular Washing: Include your headlights in your regular car washing routine. Use mild car soap and a soft microfiber cloth or sponge to gently clean the lens surface. Avoid using harsh chemicals or abrasive materials that could damage protective coatings or lenses.
- Bug and Tar Removal: Bugs and tar can accumulate on the surface of the headlights, obstructing light output and potentially causing damage. Use a bug and tar remover specifically formulated for automotive use to safely remove these contaminants.
Regular Inspections
- Visual Checks: Periodically inspect your headlights for any signs of damage, such as scratches, cracks, or hazing. Addressing minor issues early can prevent further deterioration and the need for extensive restoration in the future.
- Moisture or Condensation: Check for any moisture or condensation inside the headlight assembly. If you notice moisture buildup, it may indicate a damaged seal or a crack in the lens. Address these issues promptly to prevent water damage and potential electrical issues.
Preventive Measures
- Protective Coverings: Consider using protective coverings, such as headlight protectors or clear films, to shield your headlights from debris, road salt, and other elements. These coverings provide an additional layer of protection, prolonging the clarity of your lenses.
- Garage or Covered Parking: Whenever possible, park your vehicle in a garage or under a covered area to minimize exposure to harsh weather conditions, direct sunlight, and environmental pollutants.
By following these maintenance tips, you can extend the lifespan of your restored headlights and enjoy optimal visibility and safety while driving. Regular cleaning, inspections, and preventive measures will help maintain the clarity and functionality of your headlights for the long term.
Frequently Asked Questions (FAQs)
As you consider headlight lens restoration, you may have some questions about the process, benefits, and potential risks involved. Here are answers to frequently asked questions to provide you with the necessary information:
Please let me know if there’s anything else I can help you with.