Meguiar’s headlight kit appraisal
Meguiar sells two headlight restoration kits:
- The two-step headlight restoration kit
- The heavy-duty headlight restoration kit.
From the packaging the kits offer different approaches to headlight restoration, the two-step kit works well on headlights with low damage and the heavy-duty kit works on headlights with severe oxidation.
Table of Contents
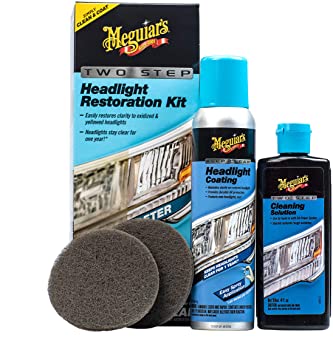
Meguiar’s two-step kit

Contents within include:
- One headlight coating spray canister
- One bottle of cleaning solution
- Two cleaning pads for each headlight
Step 1
Tape the surrounding areas around the headlight close to any paintwork to avoid damaging the paint.
Step 2
Clean the headlight and ensure it is dry before beginning the next stage. Use a towel to dry if necessary.
Step 3
Take a cleaning pad and apply the cleaning solution. Work on the headlight in circular motions and ensure the entire lens is worked on. Wipe the headlight to check if the oxidation is entirely off; if not, repeat the process until the headlight is evenly hazy.
Rinse the headlight and ensure that the surface is completely dry
Step 4
Shake the headlight solution well; spray the solution horizontally from one side to another on a clean surface. Ensure spraying is in overlapping patterns.
When fully sprayed, wait for 5 minutes, then spray a second coat on the headlight and leave for 5 minutes. To fully cure, the headlight must be left for 24 hours.
Conclusion
The kit is holistic in its approach to headlight restoration. It covers correction and protection.
The main disadvantage of this kit is that it only uses pads to remove oxidation; this will not suffice because part of the correction involves removing the harder layers of the previous coating. It is better to have different types of sandpaper instead.
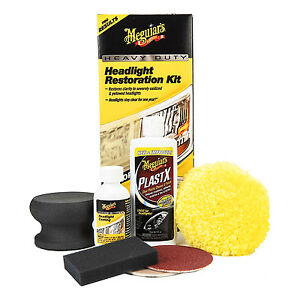
Meguiar’s heavy-duty kit.

This kit contains:
- PlastX Polish
- Headlight Coating
- Headlight Coating applicator pad
- buff wool pad
- 3000 and 1000-grit sanding discs
- Hand sanding pad
Step 1
Tape the surrounding areas around the headlight that are close to any paintwork. This is done to avoid damaging the paint.
Step 2
Clean the headlight and ensure it is dry before beginning the next stage. Use a towel to dry if necessary.
Step 3
Take the 1000-grit sandpaper and apply it to the hand sanding pad. Spray the headlight with water and ensure that the sandpaper is wet. Sand in a hash pattern and work on the whole headlight.
Keep adding moisture to avoid clogging the sandpaper. Check that all areas are worked on and that the surface is evenly hazy. Once confirmed, and no patches are visible we can advance to the next stage.
Step 4
On a clean surface, repeat the same process as in step 3, only using the 3000-grit sandpaper instead. Clean the headlight before proceeding to the next step.
Step 5
Attach the wool pad to the drill and apply plastX polish to the pad. Distribute the polish evenly on the headlight surface. Begin polishing with the slow setting, then advance to the faster setting. Work on the headlight until all the hazy marks are entirely off. Rinse the headlight and proceed to the next stage
Step 6
Apply the headlight coating on the applicator pad and apply the coating on the headlight in horizontal motions overlapping by 50%. Allow sitting for 5 minutes before applying the second coat. Let the coating sit for 24 hours to fully cure.
Conclusion
This kit is also holistic in its approach; it covers correction and protection in its process.
It can be made better by using coarser sandpaper such as 400,600 and 800 grit sandpaper. This helps to make it easier to get rid of oxidation.
Applying a clear coat with a pad has disadvantages because the finish is not as smooth as using an aerosol can.
Of the two kits made by Meguiar’s, it is better to use the heavy-duty kit than the two-step restoration kit.