Headlight Restoration with Drill: Restoring Clarity and Safety to Your Headlight
Table of Contents
Introduction
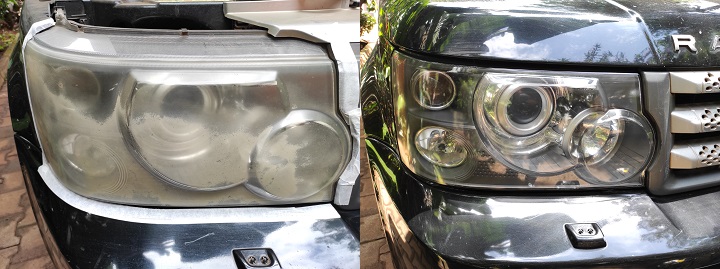
When it comes to driving safely, clear and functional headlights are crucial. Over time, headlights can become dull, hazy, and yellow due to UV exposure, oxidation, and scratches. These issues not only diminish the aesthetics of your vehicle but also compromise your visibility on the road. Fortunately, headlight restoration techniques have evolved to address these problems effectively. One such method is headlight restoration with a drill, which offers an efficient and convenient way to bring clarity and safety to your headlights.
Restoring your headlights with a drill can provide a range of benefits. By using the power of a drill, you can effectively remove the hazy and damaged outer layer of the headlight lens, revealing the clear and bright surface beneath. The drill’s rotational motion, combined with the right restoration products and techniques, helps to eliminate oxidation, scratches, and other imperfections that obstruct the headlight’s performance. This process not only enhances the appearance of your vehicle but also improves the functionality of your headlights, allowing for better visibility and safer driving.
In the following sections, we will explore the process of headlight restoration with a drill. From preparing the headlights to applying a protective sealant, you will discover the techniques and tips to achieve optimal results. So, let’s dive into the details and learn how to restore your headlights to their former glory using a drill.
Understanding Headlight Restoration
Restoring your headlights to their original clarity and functionality is essential for maintaining optimal visibility and safety on the road. Before diving into the specifics of headlight restoration with a drill, it’s important to understand the fundamentals of headlight deterioration and the various methods available for restoration.
Headlight Lens Material
Headlight lenses are typically made of either plastic or polycarbonate material. These materials are lightweight, durable, and resistant to shattering. However, they are susceptible to damage and degradation over time due to environmental factors and regular wear and tear.
Causes of Headlight Damage and Deterioration
Several factors contribute to headlight damage and deterioration, including:
- UV Exposure: Prolonged exposure to sunlight leads to the breakdown of the protective coating on the headlight lens, resulting in hazing and yellowing.
- Oxidation: The headlight lens can oxidize over time, creating a cloudy and dull appearance.
- Scratches: Small scratches can accumulate on the surface of the lens, diffusing the light and reducing its intensity.
- Environmental Factors: Road debris, chemicals, and harsh weather conditions can all contribute to the deterioration of headlights.
Different Methods of Headlight Restoration
There are various methods available for headlight restoration, each with its advantages and limitations. Some common techniques include:
- Sandpaper Method: Using various grits of sandpaper to manually sand away the damaged outer layer of the headlight lens is followed by the steps of polishing and sealing.
- Restoration Kits: Commercially available headlight restoration kits often include abrasive compounds, polishing pads, and protective coatings to restore the clarity of the lens. These kits typically require a manual application.
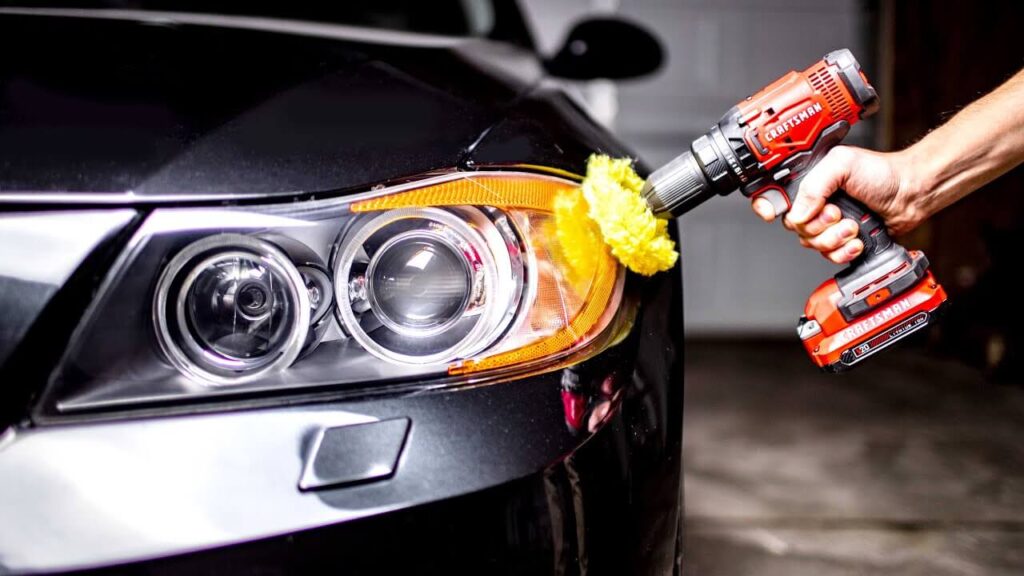
- Drill-Based Systems: Utilizing a drill for headlight restoration offers several benefits. These systems typically include specialized drill attachments, sanding pads, and polishing compounds designed to restore clarity efficiently and effectively.
Advantages of Using a Drill for Headlight Restoration
Headlight restoration with a drill-based system provides several advantages over other methods:
- Efficiency: The rotational motion of the drill combined with the appropriate attachments allows for quicker and more efficient restoration.
- Consistency: The controlled speed and pressure of the drill help ensure consistent results across the headlight lens.
- Ease of Use: Utilizing a drill simplifies the restoration process, making it accessible for both DIY enthusiasts and professionals.
- Enhanced Results: The power of the drill, when paired with the right restoration products, can effectively remove deep oxidation, scratches, and other imperfections, resulting in significantly improved clarity.
By understanding the basics of headlight deterioration and the advantages of using a drill for restoration, you can make an informed decision and proceed with confidence to restore the clarity and safety of your headlights. In the following sections, we will delve deeper into the step-by-step process of headlight restoration with a drill, providing you with the knowledge and guidance needed to achieve excellent results.
Preparation and Safety Measures
Before embarking on the headlight restoration process with a drill, it is crucial to prepare adequately and prioritize safety. Taking the necessary precautions will help ensure a smooth and successful restoration while safeguarding both yourself and your vehicle.
Gathering the Necessary Tools and Materials
To begin the restoration, gather the following tools and materials:
- Drill: Use a drill with adjustable speed settings to allow for precise control during the restoration process.
- Drill attachments: Choose drill attachments specifically designed for headlight restoration, such as sanding pads and polishing discs.
- Masking tape: This will be used to protect the surrounding areas of the headlight, preventing any accidental damage.
- Microfiber cloth: Prepare a clean and lint-free microfiber cloth for wiping the headlight lens and applying the restoration products.
- Headlight restoration kit: Consider investing in a quality headlight restoration kit that includes abrasives, polishes, and protective coatings designed to restore clarity to the lens.
Precautions to Take Before Starting the Restoration Process
Before starting the restoration, follow these precautions:
- Read instructions: Familiarize yourself with the specific instructions provided by the headlight restoration kit manufacturer.
- Work in a well-ventilated area: Ensure proper ventilation to avoid inhaling any fumes from the restoration products.
- Wear protective gear: Protect your hands with gloves and wear safety glasses to shield your eyes from any debris or chemicals.
- Test on a small area: Before proceeding with the entire headlight, perform a test on a small, inconspicuous area to ensure compatibility with your specific headlight lens material.
Protecting the Surrounding Areas of the Vehicle
To prevent any accidental damage to your vehicle’s paintwork or adjacent components, take the following precautions:
- Apply masking tape: Carefully apply masking tape around the headlight, creating a protective barrier on the surrounding surfaces.
- Cover adjacent areas: Use plastic sheets or newspapers to cover nearby panels, grille, and any other parts that may be at risk of contact during the restoration process.
Ensuring Personal Safety During Restoration
Your safety is paramount throughout the restoration process. Follow these safety measures:
- Work in a well-lit area: Ensure sufficient lighting to clearly see the condition of the headlight and accurately perform the restoration.
- Maintain a steady grip: Hold the drill securely, maintaining control and stability throughout the restoration.
- Avoid excessive pressure: Apply consistent but moderate pressure to avoid damaging the headlight lens.
- Take breaks if needed: If the restoration process is time-consuming, take regular breaks to prevent fatigue and maintain focus.
By taking these necessary preparation steps and adhering to safety measures, you are ready to proceed with confidence to restore your headlights using a drill. The next section will guide you through the step-by-step restoration process, enabling you to achieve impressive results and revive the clarity and safety of your headlights.
Step-by-Step Guide to Headlight Restoration with Drill
Restoring your headlights using a drill can restore their clarity and enhance your visibility on the road. By following a systematic approach, you can achieve impressive results. This step-by-step guide will walk you through the headlight restoration process, starting with cleaning and masking the headlights.
Cleaning and Masking the Headlights
Before starting the restoration process, it’s essential to clean the headlights and remove any dirt, grime, or debris that may have accumulated. Follow these steps:
- Gather the necessary cleaning supplies: Prepare a bucket of warm water, car shampoo, and a soft sponge or microfiber cloth.
- Rinse the headlights: Use a hose or a clean sponge soaked in water to rinse the headlights thoroughly. This will help loosen any surface dirt or loose particles.
- Apply car shampoo: Dilute the car shampoo in the bucket of warm water according to the instructions. Dip the sponge or cloth into the soapy water and gently scrub the headlights, removing any stubborn grime or residue.
- Rinse again: After scrubbing, rinse the headlights with clean water to remove any remaining soap or dirt.
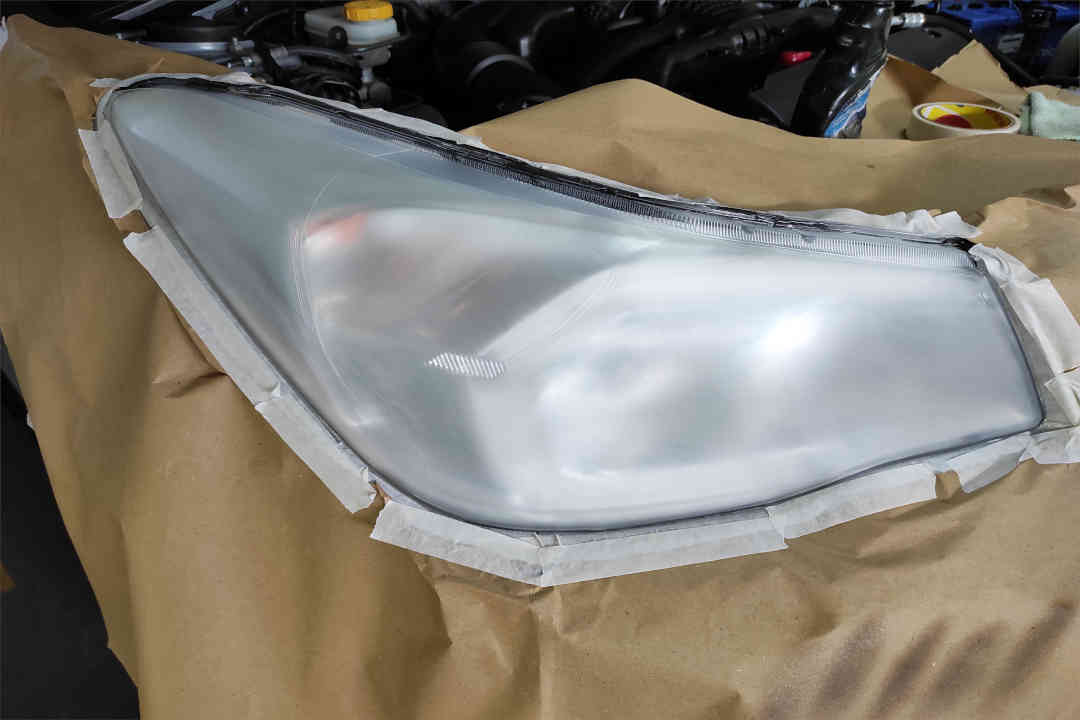
- Once the headlights are clean, it’s time to mask off adjacent areas to protect them from any accidental damage during the restoration process.
- Gather masking materials: Prepare masking tape and plastic sheets or newspapers.
- Apply masking tape: Carefully apply masking tape around the headlights, creating a protective barrier on the surrounding surfaces such as the car’s paintwork, grille, and adjacent panels. Ensure that the tape adheres firmly to create a clean separation line.
- Cover adjacent areas: Use plastic sheets or newspapers to cover any additional areas that are at risk of contact with restoration products, ensuring full protection of your vehicle.
By properly cleaning the headlights and masking off adjacent areas, you have established a clean and protected workspace for the next steps of the headlight restoration process. In the upcoming sections, we will delve into the subsequent steps, which include sanding, polishing, and sealing the headlights to restore their clarity and rejuvenate their appearance.
Selecting the Right Abrasive Materials and Drill Attachments
To achieve optimal results when restoring your headlights with a drill, it’s crucial to select the right abrasive materials and drill attachments. This section will provide an overview of different grits and their uses, as well as recommend drill attachments for headlight restoration.
Overview of Different Grits and Their Uses

When it comes to headlight restoration, various abrasive materials are available in different grits. Each grit level serves a specific purpose in the restoration process. Here are the common grits used and their recommended uses:
1. Coarse grit (e.g., 400–600 grit): This grit level is suitable for removing heavy oxidation, deep scratches, and stubborn stains on the headlight surface. It helps level the surface and prepare it for finer polishing.
2. Medium grit (e.g., 800-1000 grit): The medium grit is ideal for refining the headlight surface after using the coarse grit. It further smooths the surface, removes finer scratches, and enhances clarity.
3. Fine grit (e.g., 1500–2000 grit): Fine grit is used for final sanding and achieving a smooth, polished surface. It helps to eliminate any remaining imperfections, haze, or cloudiness, providing a clear finish.
4. Extra-fine grit (e.g., 3000-5000 grit): For achieving a professional-grade finish, extra-fine grit is used. It removes any residual scratches and brings out a high level of clarity and shine on the headlights.
Recommended Drill Attachments for Headlight Restoration
When using a drill for headlight restoration, the right attachments can make the process more efficient and effective. Consider the following recommended drill attachments:
1. Sanding discs: Attach sanding discs with appropriate grit levels to the drill. These discs are specifically designed for sanding and leveling the headlight surface during the restoration process
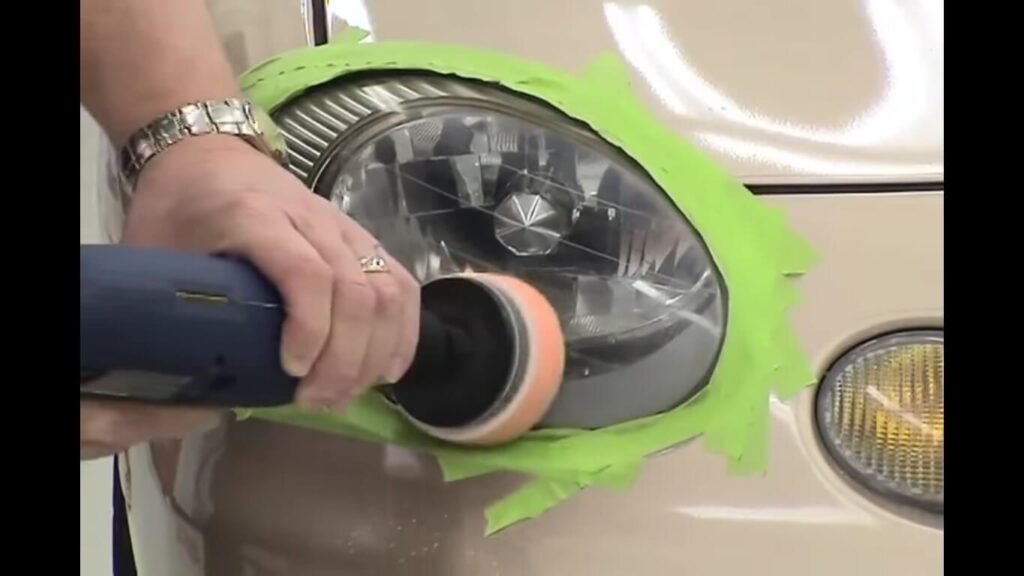
Sanding the Headlights
Sanding the headlights is a crucial step in the restoration process as it helps remove imperfections, scratches, and oxidation from the surface. With the right techniques and grit progression, you can achieve remarkable results. In this section, we will provide step-by-step instructions for sanding with the drill, along with techniques for even and controlled sanding.
Step-by-Step Instructions for Sanding with the Drill
1. Prepare the headlights: Before starting the sanding process, ensure that the headlights are clean and free from dirt or debris. You can use a mild detergent or a specialized headlight cleaner to thoroughly clean the surface. Once cleaned, dry the headlights completely.
2. Attach the sanding disc: Select the appropriate grit sanding disc based on the condition of your headlights. Coarse grits, such as 400–600, are typically used for initial sanding. Attach the sanding disc securely to your drill, following the manufacturer’s instructions.
3. Start sanding: Hold the drill firmly with both hands, positioning the sanding disc on the headlight surface. Begin sanding using gentle pressure and circular or back-and-forth motions. Ensure that you cover the entire surface evenly. Keep the drill moving constantly to avoid applying excessive pressure in one area.
4. Controlled sanding techniques: To achieve even and controlled sanding, consider the following techniques:
- Maintain a consistent speed: Keep a steady speed throughout the sanding process. Avoid speeding up or slowing down, as it can lead to uneven sanding and potential damage to the headlights.
- Overlapping strokes: Overlap each sanding stroke slightly to ensure uniform coverage and prevent any lines or marks on the surface.
- Light pressure: Apply light to moderate pressure while sanding. Excessive pressure can result in uneven sanding or even cause damage to the lens.
5. Progress through different grits: After completing the initial sanding with the coarse grit, gradually progress to finer grits for optimal results. Change the sanding disc to a medium grit (e.g., 800-1000) and repeat the sanding process. Continue with finer grits, such as 1500–2000, for smoother and more refined results.
Remember to periodically clean the sanding disc and headlights during the process to remove any debris and prevent scratching. Once you’ve completed the sanding stage, it’s time to move on to the next step: polishing the headlights. We’ll explore this in detail in the following section.
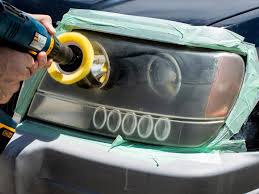
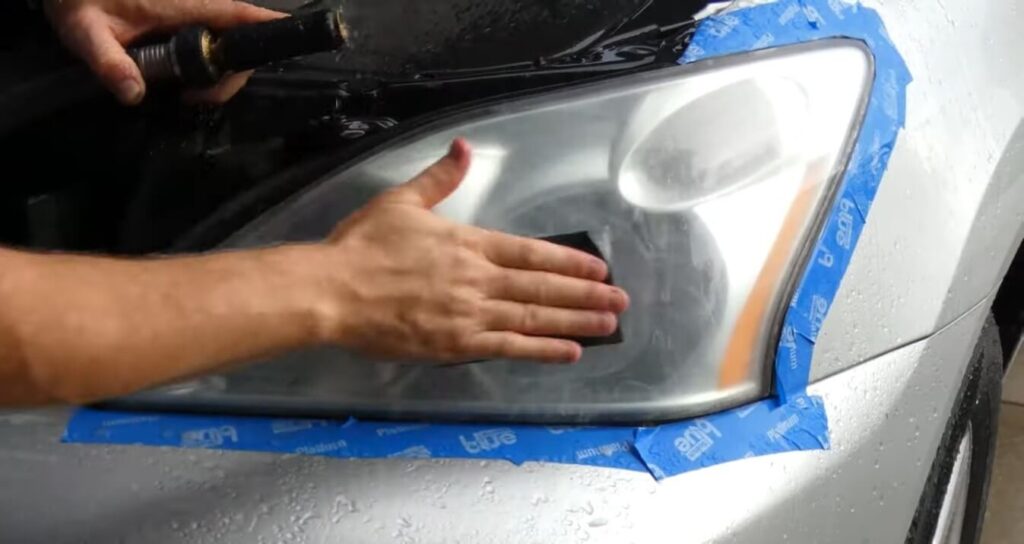
Polishing and Buffing the Headlights
To restore the clarity and shine of your headlights, polishing, and buffing are essential steps in the headlight restoration process. In this section, we will discuss the techniques and tools required to polish and buff your headlights using a drill effectively.
Applying a Polishing Compound to Restore Clarity
Applying a polishing compound is a crucial step in restoring the clarity of your headlights. The polishing compound helps remove haze, scratches, and oxidation, giving your headlights a renewed appearance. Follow these steps for the effective application of the polishing compound:
1. Choose a high-quality polishing compound specifically formulated for headlight restoration. Look for a product that is designed to remove haze and restore optical clarity.
2. Start by cleaning the headlights thoroughly to remove any dirt, grime, or debris. Use a mild detergent and water solution or a specialized headlight cleaning solution. Rinse and dry the headlights before proceeding.
3. Apply a small amount of the polishing compound to a clean, soft cloth or a foam applicator pad. Begin rubbing the compound onto the headlight surface using gentle circular motions. Ensure that you cover the entire headlight evenly.
4. Work in small sections to ensure thorough coverage. Continue applying the polishing compound until you notice an improvement in the clarity of the headlights. If necessary, apply additional compound to stubborn areas or scratches.
Techniques for Effective Polishing with the Drill
Polishing your headlights using a drill can help expedite the process and achieve more consistent results. Here are some techniques to follow when using a drill for polishing:
1. Attach a polishing pad to the drill. Choose a foam or wool pad specifically designed for automotive polishing. Ensure that it is clean and free from any debris or residue from previous uses.
2. Set the drill to a low to medium speed setting. Starting at a lower speed helps prevent excessive heat buildup and allows you to have better control over the polishing process.
3. Apply a small amount of polishing compound directly onto the pad. Spread it evenly across the pad’s surface.
4. Place the pad against the headlight surface and apply light to moderate pressure. Move the drill in overlapping, circular motions or back-and-forth motions. This technique helps distribute the polishing compound evenly and ensures consistent coverage.
5. Work on one section of the headlight at a time, focusing on areas that require more attention. Continue polishing until you achieve the desired level of clarity and shine.
Buffing the Headlights to Achieve a Glossy Finish
After polishing, the final step is to buff the headlights to achieve a glossy finish. Buffing helps remove any residue from the polishing compound and enhances the overall appearance of the headlights. Follow these steps to effectively buff your headlights:
1. Attach a clean buffing pad to the drill. Choose a soft, lint-free cloth or a foam buffing pad.
2. Apply a small amount of a dedicated headlight buffing or finishing compound to the pad. This compound is designed to enhance the shine and provide a protective layer to the headlights.
3. Gently move the buffer across the headlight surface using overlapping motions. Apply light pressure and ensure even coverage.
4. Continue buffing until you achieve the desired level of glossiness and clarity. Take breaks and inspect the headlights periodically to assess your progress.
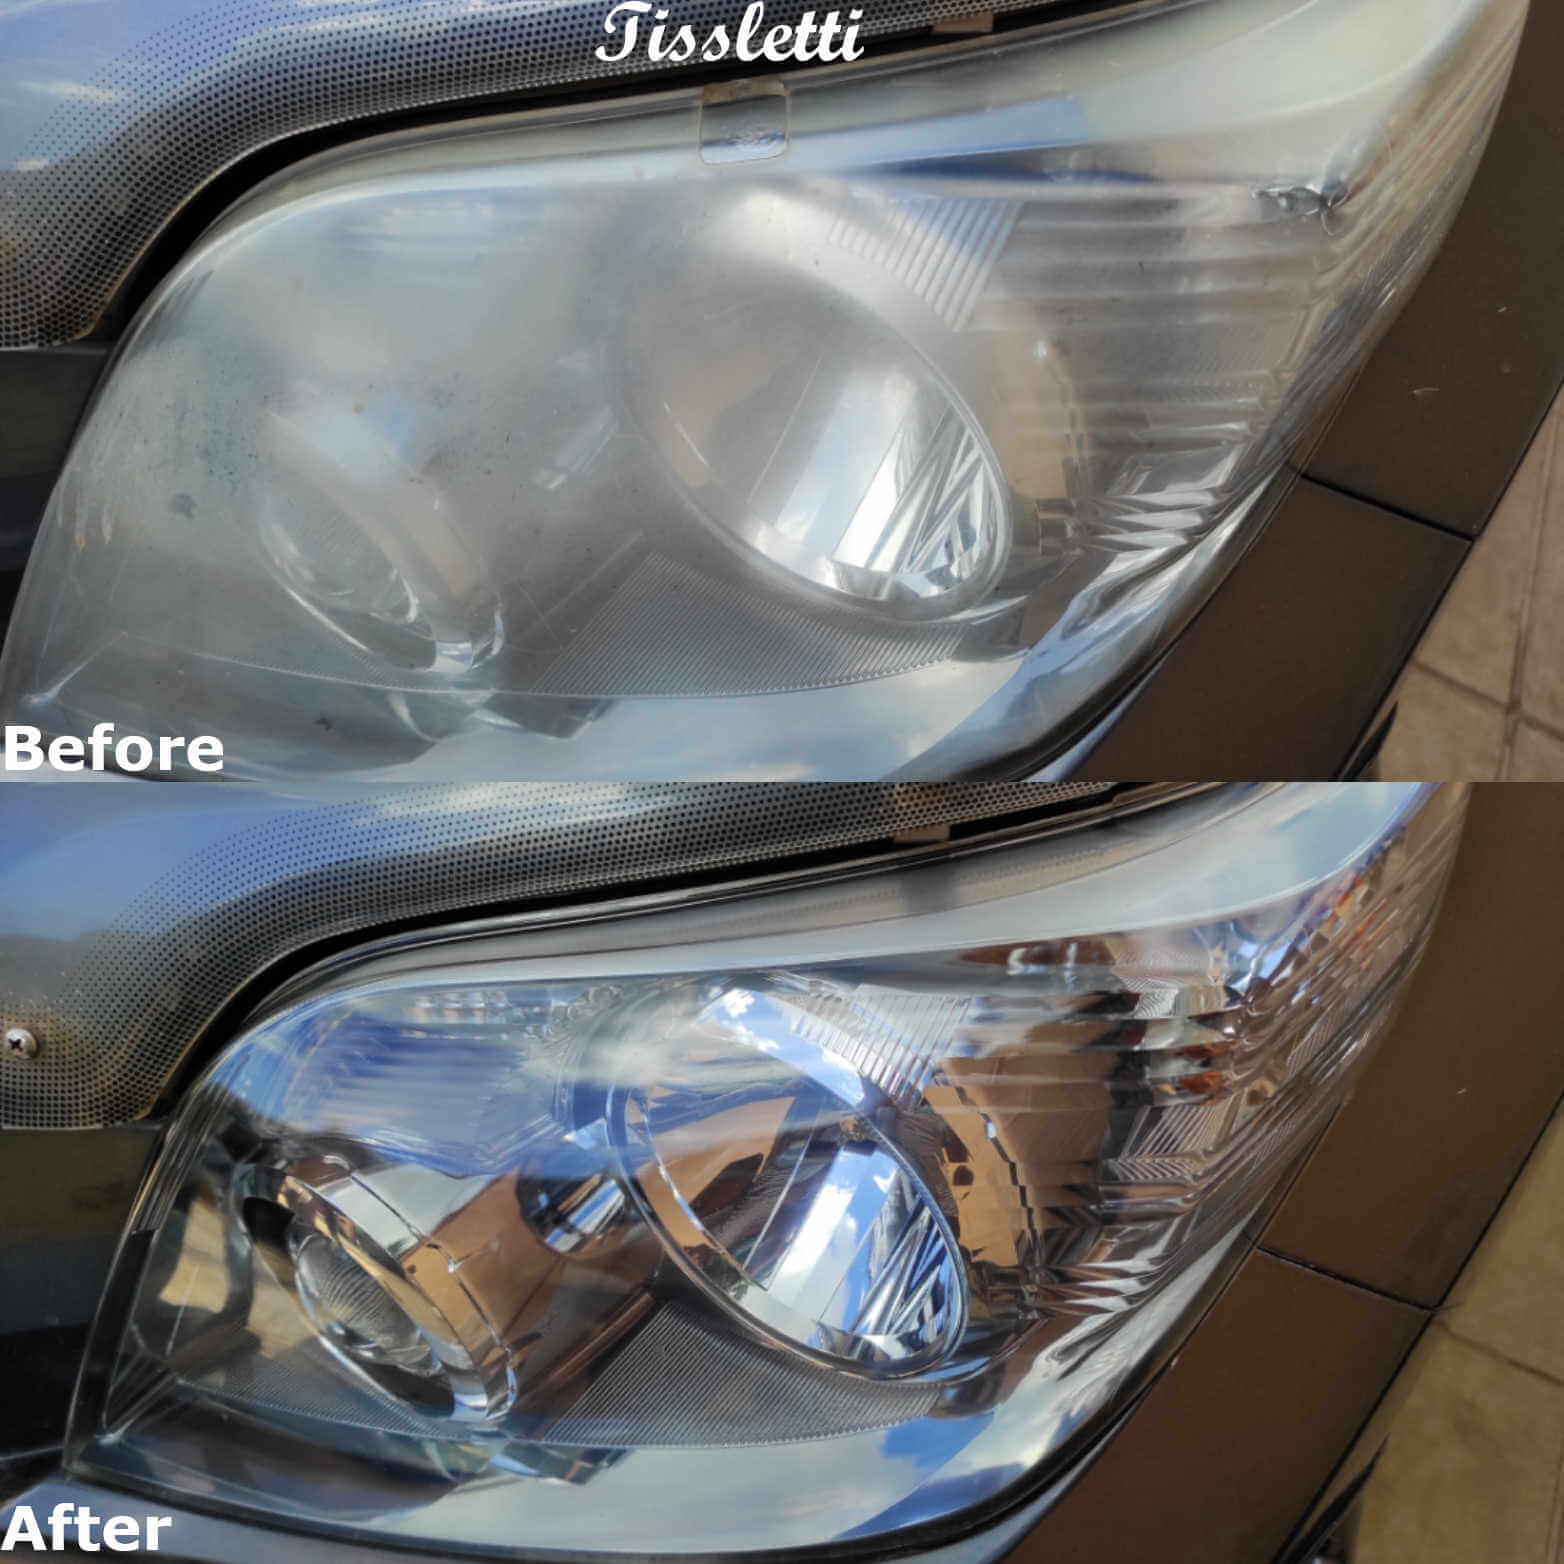
By following these steps and using the right techniques, you can effectively polish and buff your headlights, restoring their clarity and giving them a glossy, like-new appearance.
Applying a Protective Sealant or Coating
After successfully restoring your headlights to their former glory, it’s crucial to apply a protective sealant or coating to ensure their long-lasting clarity and prevent future damage. The sealant acts as a barrier, shielding the headlights from harmful UV rays, oxidation, and environmental contaminants. Here’s a step-by-step guide on how to apply a sealant or coating to your restored headlights:
Importance of Sealing the Restored Headlights
Sealing the restored headlights is a crucial step in the restoration process. It helps to maintain the clarity and brightness of the headlights for an extended period. By creating a protective barrier, the sealant guards against UV damage, discoloration, and hazing caused by environmental factors like sunlight, dirt, and pollution.
Types of Sealants or Coatings Available
There are various types of sealants or coatings available for headlight protection. Here are a few common options:
- Acrylic Sealants: These sealants provide a clear protective layer and are easy to apply. They offer good UV resistance and durability, ensuring the longevity of your headlights.
- Ceramic Coatings: Ceramic coatings provide an ultra-durable and long-lasting protective layer. They offer excellent resistance to UV rays, chemicals, and oxidation, keeping your headlights in pristine condition for an extended period.
- Polymer Sealants: Polymer-based sealants offer a glossy finish and effective protection against UV damage, oxidation, and environmental contaminants. They are easy to apply and provide enhanced durability.
Step-by-Step Guide for Applying the Sealant or Coating
To apply the sealant or coating to your restored headlights, follow these steps:
a. Clean the Headlights: Ensure that the headlights are thoroughly cleaned and free from any dirt, debris, or residue. Use a gentle automotive cleaner and a microfiber cloth to achieve a clean surface.
b. Apply the Sealant or Coating: Follow the manufacturer’s instructions for the specific sealant or coating you are using. Using an applicator pad or a microfiber cloth, apply the sealant or coating evenly onto the headlights. Work in small sections and avoid overlapping.
c. Spread and Buff: After applying the sealant or coating, use a clean microfiber cloth to spread it evenly across the headlights. Buff gently in circular motions to ensure proper coverage and remove any excess product.
d. Allow to Cure: Give the sealant or coating sufficient time to cure as per the manufacturer’s instructions. This typically ranges from a few hours to a day, depending on the product.
e. Perform Final Inspection: Once the sealant or coating has cured, inspect the headlights for any missed spots or uneven application. If necessary, reapply the product to achieve uniform coverage.
You can enjoy improved visibility, enhanced aesthetics, and long-lasting results by applying a protective sealant or coating to your restored headlights. It’s a small investment of time and effort that goes a long way toward maintaining the beauty and functionality of your vehicle’s headlights.
Tips for Optimal Results

To achieve the best possible results during the headlight restoration process, it’s important to follow proper techniques and use the right tools. Here are some valuable tips to help you achieve optimal results:
Recommended Drill Speed and Pressure for Different Stages
The drill speed and pressure you apply during the restoration process can significantly impact the outcome. Here’s a guideline for different stages:
- Sanding: Use a moderate drill speed and apply light to medium pressure when sanding the headlights. Be cautious not to apply excessive pressure, as it can damage the headlight surface.
- Polishing: Increase the drill speed to a medium-high setting and maintain a steady, even pressure. Avoid applying excessive pressure, as it can generate heat and cause damage to the headlights. Let the polishing compound do the work.
- Buffing: Similar to the polishing stage, use a medium-high drill speed and moderate pressure. Ensure the buffing pad is evenly distributed on the headlight surface for consistent results.
Proper Technique for Sanding and Polishing
Sanding and polishing are crucial steps in headlight restoration. Here are some key techniques to keep in mind:
- Sanding Technique: Start with the coarsest grit sandpaper recommended for the level of oxidation or damage on the headlights. Begin sanding in a horizontal motion, applying even pressure. Gradually move to finer grit sandpaper using both horizontal and vertical strokes. Rinse the headlights and sandpaper regularly to prevent clogging. Continue sanding until the desired level of clarity is achieved.
- Polishing Technique: Apply a small amount of polishing compound to a clean, soft cloth or a polishing pad attached to the drill. Spread the compound evenly on the headlight surface. Use slow, overlapping circular motions to work the compound into the plastic. Continue polishing until the headlights regain their clarity and shine.
Troubleshooting Common Issues During the Restoration Process
Even with proper techniques, you may encounter some common issues during the headlight restoration process. Here are a few troubleshooting tips:
- Hazing or Cloudiness: If the headlights appear hazy or cloudy after polishing, it may indicate residue from the compound. Wipe the headlights with a clean cloth dampened with water or a mild automotive cleaner to remove any residue.
- Uneven Results: Uneven sanding or polishing can lead to inconsistent results. Ensure that you sand and polish each headlight using the same techniques and pressure. Take your time and work systematically to achieve uniform results.
- Scratches: If you notice scratches on the headlights after sanding, you may need to switch to a finer grit sandpaper and continue sanding. Gradually work your way to a finer grit to remove the scratches and restore clarity.
Maintaining and Prolonging the Results of Headlight Restoration

To prolong the results of your headlight restoration and maintain their clarity, consider the following tips:
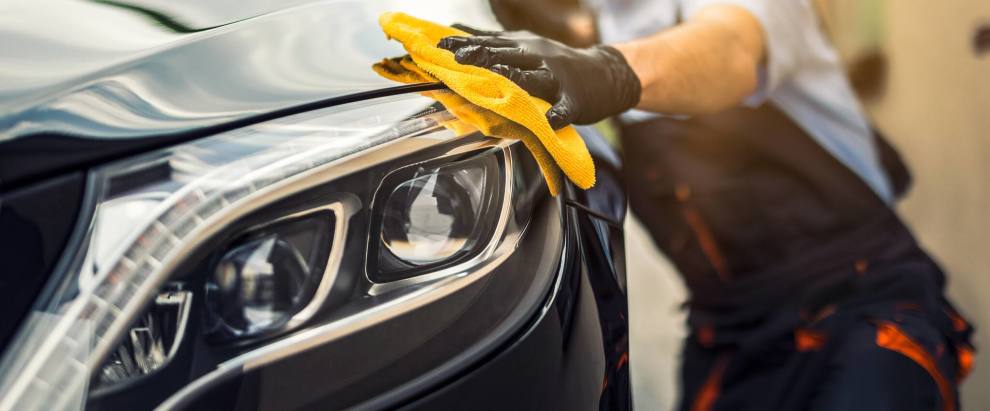
- Regular Cleaning: Clean your headlights regularly with a gentle automotive cleaner and a microfiber cloth. This will help remove dirt, debris, and road grime that can degrade the clarity over time.
- Protective Coating: Apply a protective coating or sealant after the restoration process to provide an additional layer of protection against UV rays and environmental factors. Follow the manufacturer’s instructions for proper application.
- Parking in Shade: Whenever possible, park your vehicle in shaded areas or use a car cover to minimize prolonged exposure to direct sunlight, which can cause fading and damage to the headlights.
By following these tips, you can ensure optimal results and prolong the clarity and appearance of your restored headlights. Remember to exercise patience, use the recommended techniques, and take preventive measures to maintain the results for an extended period.
By following these tips, you can ensure optimal results and prolong the clarity and appearance of your restored headlights. Remember to exercise patience, use the recommended techniques, and take preventive measures to maintain the results for an extended period.
Frequently Asked Questions (FAQs)
Remember, proper headlight maintenance and periodic restoration can help maintain a vehicle’s overall appearance and ensure optimal performance while driving at night.