Perfect sandpaper for headlights
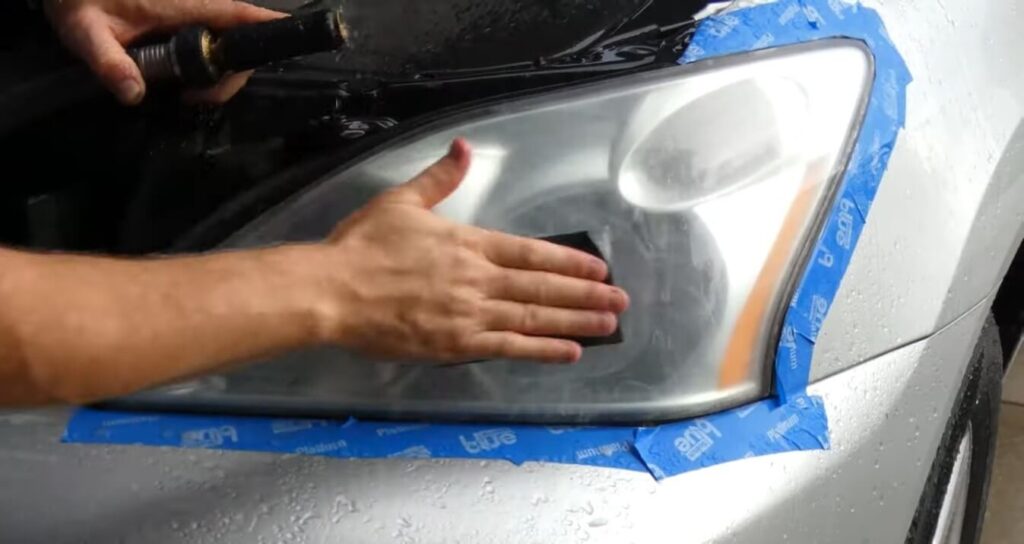
Table of Contents
Introduction
In the world of automotive care, few elements are as pivotal as clear and vibrant headlights. Headlights not only enhance the aesthetics of your vehicle but also play a crucial role in ensuring your safety on the road. Over time, factors such as environmental exposure, UV radiation, and everyday wear and tear can take a toll on your headlights, leading to a clouded and dim appearance that hampers both aesthetics and functionality.
Experts recommend starting with 600 grit sandpaper, followed by finer options such as 1000 and 1600 grit for a smoother finish. However, the choice of grit may vary depending on the condition of the headlights. Headlight lenses are made differently, to avoid damage I normally begin with 400-grit sandpaper. If it removes the oxidation, I move on to 600 grit, then 1500 grit, and finally spray a UV protective sealant. If the 400 grit does not remove the oxidation effectively or slips on the lens when wet sanding, I move on to a coarser grit like the 240 or 150, then work my way down to finer grits. This is my preferred lineup of sandpaper grit: 150, 240, 400, 600, and finally 1500. It’s essential to use proper lubrication during wet sanding to avoid damage. Always start with a coarser grit and gradually move to finer grits for optimal results.
Understanding the Importance of Headlight Restoration
As a vehicle owner, you understand the significance of maintaining your car’s performance and appearance. Headlight restoration stands as a cornerstone of this effort, as it addresses a range of concerns that impact your driving experience:
- Visibility and Safety: Dim and hazy headlights significantly reduce your nighttime visibility, making it harder to spot obstacles, pedestrians, or other vehicles. This compromised visibility can pose a real danger, especially during adverse weather conditions.
- Aesthetic Appeal: Your vehicle’s headlights are often one of the first features people notice. Dull and discolored headlights can give your car a neglected appearance, affecting its overall curb appeal.
- Resale Value: If you’re looking to sell your vehicle in the future, restoring your headlights can enhance its resale value. Well-maintained headlights are indicative of a well-cared-for vehicle.
- Longevity: Regular headlight restoration helps extend the lifespan of your headlights. By addressing oxidation and damage promptly, you can delay the need for complete headlight replacement.
The Role of Sandpaper in Headlight Restoration
Enter sandpaper, a seemingly simple yet incredibly effective tool in the arsenal of headlight restoration. Sandpaper serves as a versatile agent in the restoration process, allowing you to gently remove layers of oxidation, grime, and imperfections from the headlight surface. Its abrasive nature, when used correctly, can help reveal the original clarity of your headlights.
Why Sandpaper?
- Precision: Sandpaper comes in various grit sizes, allowing you to choose the level of abrasiveness needed to address specific imperfections.
- Gradual Restoration: The use of different grits enables a gradual restoration process, moving from coarser grits for heavy oxidation to finer grits for polishing.
- Controlled Abrasion: When applied with care, sandpaper ensures controlled abrasion, eliminating imperfections without damaging the underlying plastic.
The Sandpaper Restoration Process:
Surface Preparation: Sandpaper effectively prepares the headlight surface for restoration by removing the top layer of oxidation and debris.
Imperfection Removal: As you progress through the finer grits of sandpaper, deeper imperfections such as scratches and stubborn stains are gently addressed.
Clarity Enhancement: The final stages of sanding involve using ultra-fine grits to polish the headlight, revealing its original clarity.
In the upcoming sections, we’ll delve deeper into the nuances of sandpaper selection, grit choices, and the step-by-step process of headlight restoration, empowering you to take charge of revitalizing your vehicle’s headlights.

Different Grit Sizes and Their Effects on Headlight Restoration
Coarse Grits (40 to 800): Coarser grits are ideal for tackling severe oxidation, deep scratches, and heavy blemishes on the headlight surface.
- Material Removal: Coarse grits are more abrasive, effectively removing layers of oxidation and imperfections.
- Surface Texture: The use of coarse grits can leave behind visible scratch marks, necessitating the transition to finer grits for a smoother finish.
Medium Grits (1000 to 2000): Medium grits strike a balance between material removal and surface refinement.
- Intermediate Polishing: Medium grits help refine the surface after coarse grits, gradually reducing scratch marks and smoothing the texture.
- Preparation for Fine Grits: Medium grits create the foundation for the finer sandpaper stages, ensuring a seamless transition.
Fine Grits (3000 to 12000): Fine grits focus on polishing and achieving optical clarity.
- Scratch Removal: Fine grits eliminate the scratch marks left by coarser grits, creating a clear and smooth surface.
- Final Polishing: The application of fine grits brings out the headlight’s natural shine, enhancing its clarity and appearance.
Finding the Optimal Grit Sequence for Headlight Surface Preparation
The Gradual Approach: Headlight restoration is a journey that progresses from coarse to fine grits. This gradual approach ensures controlled abrasion and prevents the over-removal of material.
Assessing Headlight Condition: Before selecting the grit sequence, evaluate the severity of oxidation, scratches, and imperfections on the headlight surface.
Customization is key. There’s no one-size-fits-all solution. Tailor the grit sequence to the specific needs of each headlight, aiming for gradual improvement.
In the next chapter, we’ll explore the various types of sandpaper available for headlight restoration and delve into the nuances of their abrasive materials and backings. By understanding the science behind sandpaper grit and its impact on restoration outcomes, you’re equipped to embark on a journey of precise and effective headlight rejuvenation.
Types of Sandpaper for Headlight Restoration

When it comes to headlight restoration, selecting the right sandpaper is akin to choosing the perfect tool for an intricate task. The nuances in sandpaper types, abrasive materials, and backing determine the efficiency and effectiveness of your restoration efforts. In this chapter, we’ll explore the diverse world of sandpaper options and unveil the advantages and drawbacks of each.
Dry vs. Wet Sanding: Pros and Cons
Dry Sanding:
Advantages:
- Convenience: Dry sanding eliminates the need for water, making it convenient for on-the-go touch-ups.
- Less Mess: With no water involved, dry sanding reduces the mess during restoration.
Drawbacks:
- Heat Buildup: Dry sanding can generate heat due to friction, potentially damaging the headlight surface.
- Grit Clogging: The absence of water can lead to quicker grit clogging, requiring more frequent replacement.
Wet Sanding:
Advantages:
- Cooling Effect: Water acts as a lubricant, cooling down the sandpaper and minimizing the risk of surface damage.
- Better Visibility: Wet sanding keeps the headlight and sandpaper surface wet, providing better visibility of imperfections.
Drawbacks:
- Messier Process: Wet sanding can be messier due to water and debris.
- Slower Progress: The need for water can slow the restoration process compared to dry sanding.
Step-by-Step Guide: Using Sandpaper to Restore Headlights
Restoring your headlights to their former glory involves a well-executed process that combines precision, technique, and the right tools. In this comprehensive step-by-step guide, we’ll walk you through the art of using sandpaper to rejuvenate your headlights, addressing various techniques and challenges.
Preparing the Headlight Surface for Sanding
Before you begin the sanding process, it’s essential to ensure that your headlights and workspace are adequately prepared. Here’s how to set the stage for successful restoration:
1. Gather Your Supplies:
- Sandpaper with various grits (ranging from coarse to fine).
- Water source and container (for wet sanding).
- Clean, lint-free microfiber towels.
- Masking tape to protect surrounding areas.
2. Clean the Headlights
- Thoroughly wash the headlights with soap and water to remove dirt and debris.
- Dry the headlights completely before proceeding.
3. Masking Off Surrounding Areas:
- Use masking tape to protect adjacent surfaces, like the car’s paint and trim, from accidental abrasion.
Wet Sanding Technique: Steps and Best Practices
Stage 1
From experience, the best grit to begin with is 400 grit. We started with 600 grit, but we found out it wears out quickly when sanding. With the 400 grit, it cuts better, making sanding easier, and the wear is minimal. You can either use an orbital sander if you have the equipment or do it by hand. If by hand, ensure to sand in a crisscross pattern to make the surface even. Ensure the headlight has a uniform shade and no deep sanding marks are visible. The edges of the headlight are usually overlooked, so ensure they are done correctly. Once even and smooth, wipe the surface to get rid of any deposits and progress on to the next stage.
Stage 2
During this stage, we will smooth out the roughness caused by the 400-grit sandpaper. For this, we use 600-grit sandpaper. It does not cut the surface too much and smooths it even further. Work on the headlight in a crisscross pattern for best results. While sanding, feel the surface to see if it’s smooth or rough. Work on the rough areas to ensure a smooth, even surface. Once again, ensure there are no deep, visible scratches and that the surface has a uniform color. If not, work on it till the latter is confirmed, then we can move on to the next stage.
Stage 3
At this stage, we use 1500-grit sandpaper. This is where perfection begins. We sand the headlight in a crisscross pattern, with horizontal and vertical strokes. We clear any visible sanding marks and ensure the surface is as smooth as possible. By now, we should see the headlight reflector and the cloudy look should be reduced considerably. Wipe the surface to get rid of any residue. Once done, we can proceed to the next stage.
Stage 4
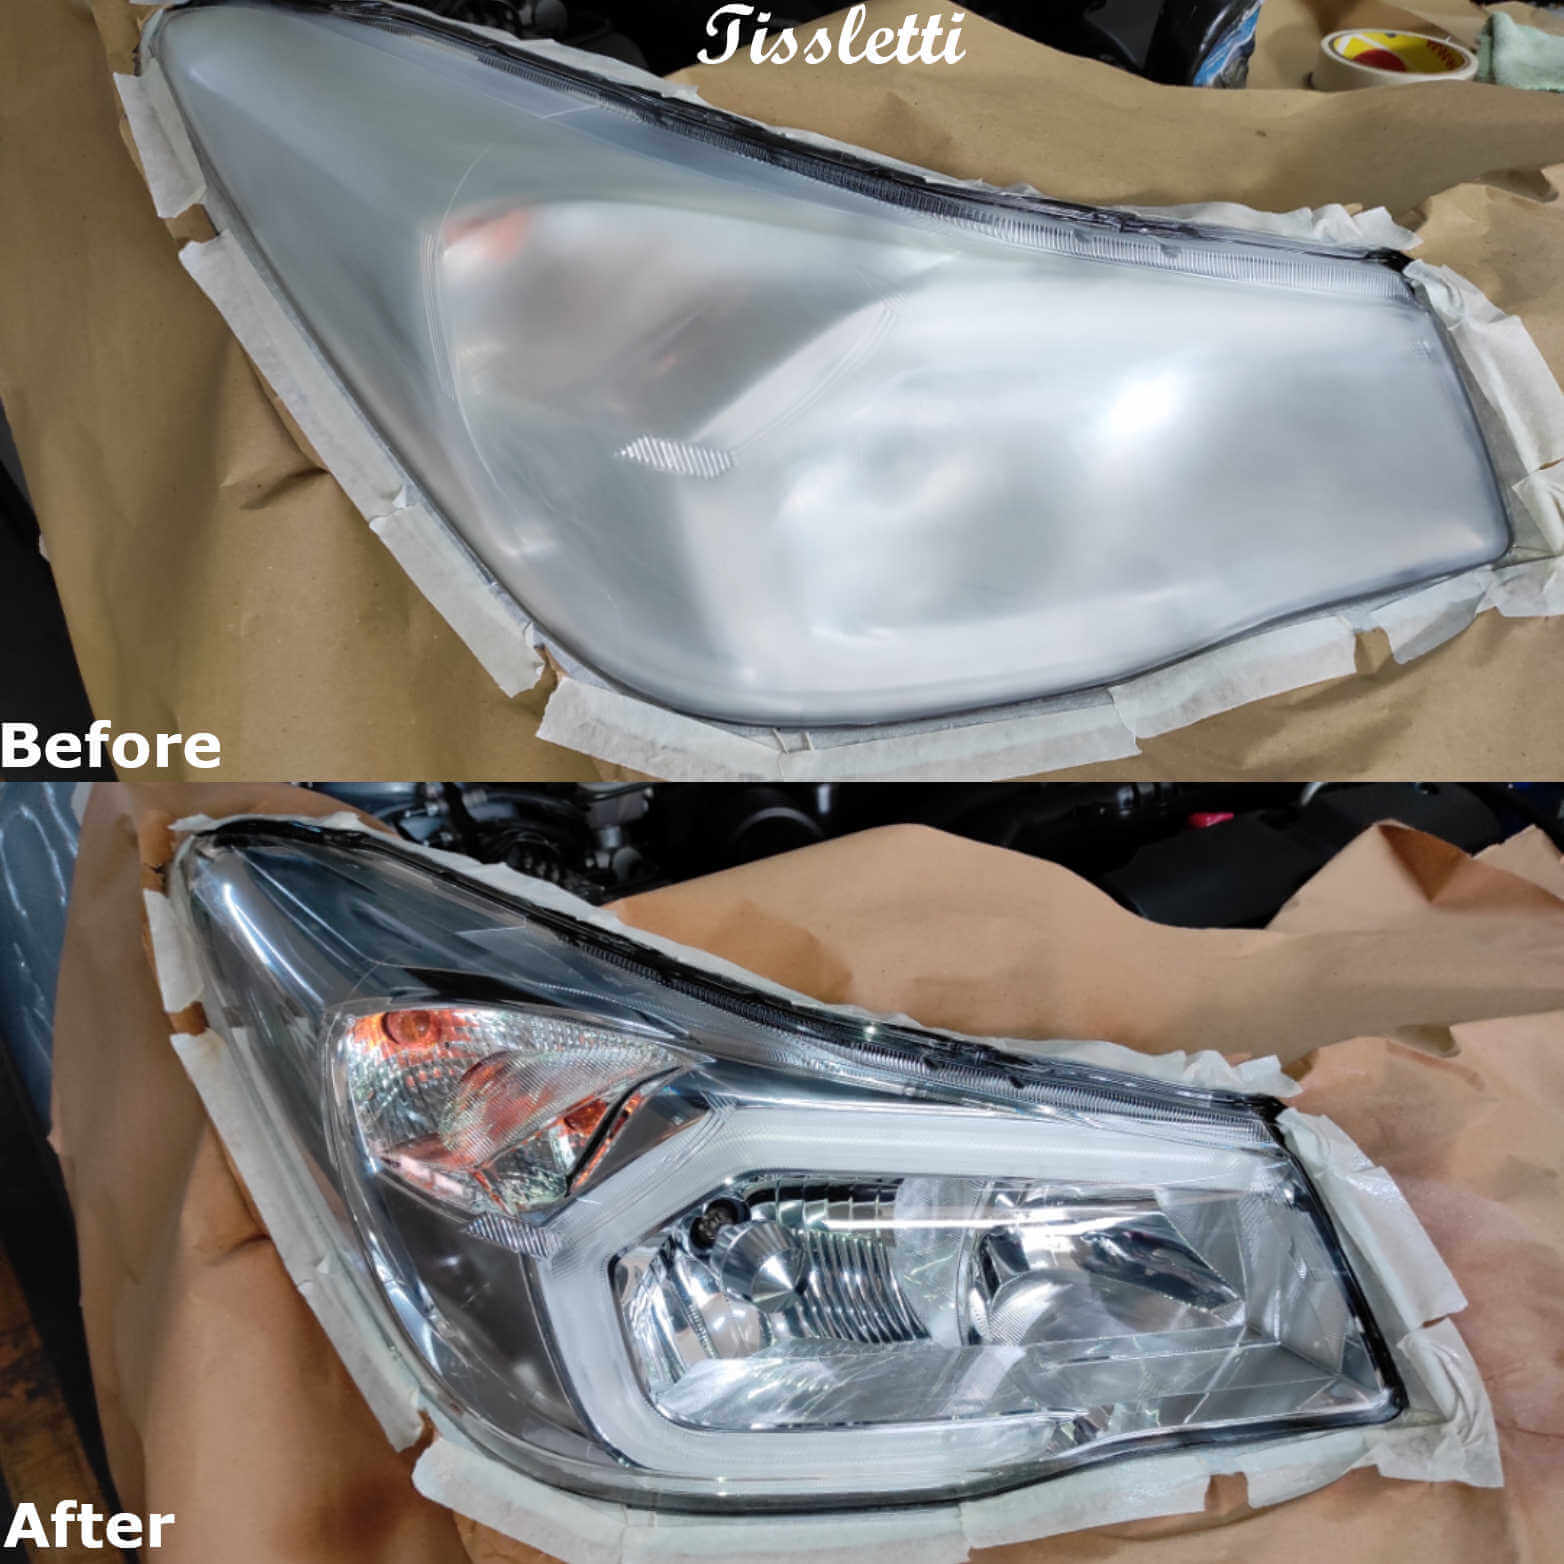
At this stage, we use 2500-grit sandpaper. In this stage, we sand down the headlight to give it a smooth glass surface. While sanding, there should be little to no resistance on the surface, and you should be able to tell how the headlight will look once the restoration is done. Again, ensure no deep sanding marks and that the surface is as smooth as possible. This is our final and last stage of sanding. That is not to say that we cannot proceed further; there is finer grit of sandpaper beyond 2500 and you can move to another stage, but for our purposes, this will suffice. Once the surface is smooth and even and no deep sanding marks are visible, we can restore the headlight fully.
After sanding, we can either polish the headlight using the buffing machine or spray a clear coat or sealant on the headlight. By polishing the headlight, we will have fully restored the headlight. The remaining bit is to protect the headlight from UV rays. To do this, we will apply a sealant. In spraying, ensure the clear coat has UV protection. Spray evenly two to three coats. Allow a ten-minute break between coats to aid adhesion. Once done, dry with infrared heat, and the job is done. Before spraying, there are preparations to be done, so please ensure everything is in order. A professional will handle this task for the majority of individuals, alleviating any concerns on your part.
Dry Sanding Technique: Achieving a Flawless Finish
Dry sanding is a quicker method that requires careful attention to prevent heat buildup and damage. It’s suitable for mild imperfections and fine-tuning the surface.
- Select the Right Grit: Choose finer grit sandpaper (e.g., 2000, 3000) for dry sanding. These grits are less aggressive and work well for polishing.
- Light Pressure: Apply light pressure to the sandpaper as you gently move it across the headlight surface. Avoid aggressive rubbing.
- Monitor Heat: Keep an eye on the heat generated. If you notice excessive heat, take breaks to prevent damage.
- Regular Inspection: Wipe away the residue and inspect the headlight frequently. You should see a gradual improvement in clarity.
- Final Polishing: Once satisfied with the smoothness, move to even finer grits (e.g., 5000, 7000) for final polishing.
Dealing with Stubborn Stains and Blemishes
Despite your best efforts, certain stains and blemishes might prove more resistant. Here’s how to address them:
- Spot Sanding: Use a small piece of sandpaper and focus on the specific stain or blemish. Gently sand the area until the imperfection is diminished.
- Polishing Compounds: If the stain persists, consider using a polishing compound specifically designed for headlights. Apply it with a polishing pad and follow the manufacturer’s instructions.
By mastering the art of using sandpaper for headlight restoration, you’re on your way to achieving headlights that shine with renewed clarity. The next chapter delves into common challenges you might encounter during the restoration process and provides effective solutions to overcome them. Stay tuned for expert insights on achieving flawless results.
Ensuring Safety and Avoiding Common Mistakes
Headlight restoration is a meticulous process that demands attention to detail and careful execution. In this chapter, we’ll delve into the crucial aspects of ensuring safety during restoration while providing insights into common mistakes to steer clear of. Let’s embark on a journey of restoration mastery while safeguarding both your health and your vehicle.
Importance of Proper Ventilation and Respiratory Protection
- Prioritize Your Health: Headlight restoration involves abrasion and sanding, which can generate fine dust particles. These particles, if inhaled, can pose risks to your respiratory system. Prioritize your health by following these steps:
- Outdoor Ventilation: Whenever possible, perform restoration tasks outdoors or in a well-ventilated area. Fresh air helps disperse dust and prevent accumulation.
- Respiratory Protection: Wear a suitable respirator or dust mask to prevent the inhalation of fine particles. Look for respirators labeled N95 or higher, as they offer effective filtration.
- Eye Protection: Don’t forget to shield your eyes with safety goggles or protective eyewear to prevent any debris from entering your eyes.
Avoiding Over-Sanding: Tips to Prevent Excessive Material Removal
Restoration finesse lies in achieving the desired results without overdoing it. Oversanding can result in unintended damage to the headlight surface. Here’s how to avoid this common mistake:
- Start with Coarser Grits: Begin with coarser grits only as needed. Skipping straight to fine grits might save time but can lead to material over-removal.
- Gentle Pressure: Apply moderate and controlled pressure during sanding. Avoid excessive force, as it can lead to uneven surfaces.
- Regular Assessment: Periodically assess your progress while sanding. Wipe away debris to gauge how much material has been removed. This helps you avoid going too far.
Protecting Surrounding Areas from Accidental Damage
Restoration should enhance, not compromise, the appearance of your vehicle. To prevent accidental damage to surrounding areas, follow these precautions:
- Masking Tape: Apply masking tape to areas adjacent to the headlight, such as the car’s paint and trim. This prevents accidental scratches or abrasions.
- Tape Removal: Remove the masking tape immediately after sanding to avoid adhesive residue that can be difficult to remove.
- Careful Movements: While sanding, be mindful of your movements to prevent the sandpaper from accidentally touching unprotected surfaces.
Extending the Longevity of Your Headlight Restoration

As the finishing touch to your meticulous headlight restoration project, ensuring the longevity of the restored clarity becomes paramount. After investing time and effort into rejuvenating your headlights, it’s essential to adopt practices that will maintain their brilliance. In this chapter, we explore the strategies that will help you extend the life of your headlight restoration, ensuring that your efforts continue to shine brightly.
Applying a Quality UV Protectant: Preserving Clarity
While your restored headlights may gleam brilliantly now, they’re not impervious to the elements. Harmful UV rays, environmental pollutants, and the effects of weathering can all take a toll on the clarity you’ve achieved.
UV protectants are your allies in the fight against degradation. These specially formulated products create a protective barrier that shields your headlights from the elements, preventing yellowing, clouding, and fading.
Maintenance Tips for Sustaining the Restored Headlight Appearance
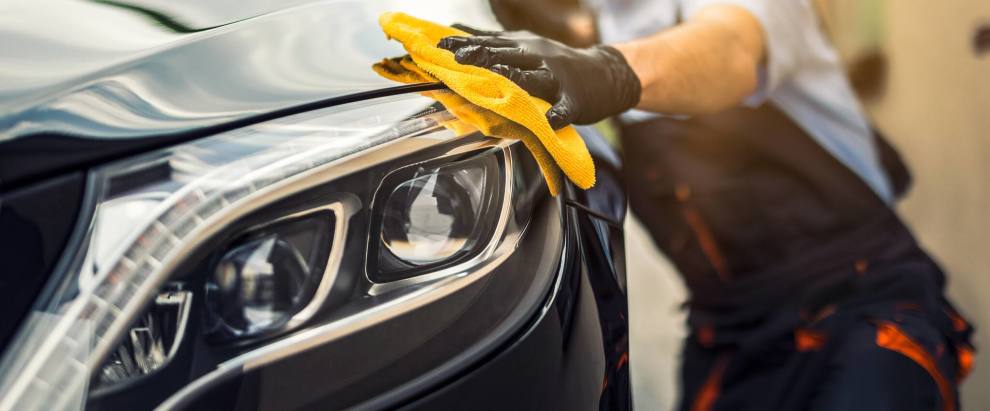
- Regular Cleaning: Maintaining the beauty of your restored headlights begins with regular cleaning. Clear away dirt, insects, and grime to keep the surface crystal clear.
- Gentle Care: Handle your headlights with care during cleaning. Avoid abrasive materials, rough sponges, or harsh chemicals that could damage the surface.
- Microfiber Magic: Opt for soft microfiber towels for cleaning. These gentle yet effective tools help prevent scratches and maintain a pristine appearance.
- Avoid harsh cleaners: harsh cleaning chemicals can strip away protective coatings and damage the lens. Stick to mild automotive cleaning products.
- Mindful Parking: Whenever possible, park your vehicle in shaded areas to reduce the direct impact of sunlight and environmental pollutants.
- Routine Inspection: Regularly inspect your headlights for signs of deterioration. Early detection allows you to take corrective action before issues escalate.
By incorporating these practices into your headlight maintenance routine, you’re making a commitment to preserving the hard-earned results of your restoration efforts. The next and final chapter is a reflective conclusion, wrapping up your journey from faded to fabulous and illuminating the transformative potential of meticulous care and attention.
Selecting the Right Sandpaper for Specific Headlight Conditions
Effective headlight restoration requires not only skill but also precision in choosing the right sandpaper for the specific condition of your headlights. Different levels of oxidation, hazing, and damage call for tailored approaches to achieve optimal results. In this chapter, we’ll guide you through the process of selecting the appropriate sandpaper grits and techniques based on your headlight’s specific condition.
Mild Oxidation and Hazing: Ideal Sandpaper Grits
Recognizing Mild Oxidation and Hazing: If your headlights exhibit a light haze or a slight dullness, you’re dealing with mild oxidation. Prolonged exposure to the sun’s UV rays and environmental elements often leads to this common issue.
The Right Grits for the Job
400 to 600 Grit: Start with a relatively coarse grit sandpaper, such as 800 or 1000, to remove the superficial layer of oxidation. This creates a smooth surface to work with.
1500 to 2000 Grit: Transition to a finer grit, like 1500 or 2000, to refine the surface and achieve a polished finish. This step further eliminates haze and prepares the headlight for the polishing phase.
Technique: Use gentle and consistent pressure during sanding to avoid over-removing material. Regularly assess your progress and adjust your technique as needed.
Severely Cloudy and Yellowed Lenses: Specialized Sanding Approaches
Dealing with Severe Cloudiness: Headlights that are severely cloudy or heavily yellowed require more intensive restoration efforts. These conditions often result from prolonged neglect and exposure to harsh conditions.
Specialized Grits and Techniques
- 300 to 600 Grit: Begin with a coarser grit, such as 300 or 600, to address severe cloudiness and yellowing. This step removes deeply embedded oxidation and prepares the surface for finer grits.
- 800 to 1500 Grit: Transition to finer grits like 800 and gradually progress to 1500. These grits further refine the surface, smoothing out imperfections and reducing cloudiness.
- 2000 to 3000 Grit: To achieve optical clarity, move on to even finer grits such as 2000 and 3000. These grits are instrumental in eliminating the remaining haze and restoring the headlight’s transparency.
Additional Considerations
- Wet Sanding: For severely cloudy headlights, wet sanding can help minimize heat buildup and enhance abrasive efficiency.
- Intermediate Inspection: Periodically stop sanding to inspect your progress. Make sure you’re on track to achieving the desired clarity.
Selecting the right sandpaper and employing the appropriate techniques for your headlight’s specific condition is pivotal for achieving outstanding restoration results. The next chapter will delve into the nuanced process of matching sandpaper grit to various imperfections and uncovering the art of achieving flawless clarity. Stay tuned for insights into fine-tuning your restoration approach for impeccable outcomes.
Frequently Asked Questions (FAQs)
In the world of headlight restoration, questions often arise as enthusiasts seek clarity on techniques, materials, and best practices. In this section, we address some of the most common inquiries that individuals have about the art and science of restoring headlights. Let’s shed light on these frequently asked questions and provide insightful answers to guide you in your restoration journey.
Conclusion
As we conclude our journey through the world of headlight restoration, we reflect on the transformative power of precision, care, and the right tools. Throughout this guide, we’ve explored the art of reviving headlights from their faded and cloudy state to a state of brilliance and clarity. Among the many tools at your disposal, the role of the right sandpaper has emerged as a key player in achieving optimal results.